Imagine turning your kitchen scraps into nutrient-rich fertilizer. You can do this at home. Vermicomposting uses worms to transform food waste into valuable compost. It’s eco-friendly and budget-friendly. This guide shows you how to start vermicompost DIY in your garden. You’ll learn step-by-step methods, tips, and tricks. Ready to grow a thriving garden with worm castings? Let’s get started!
What Is Vermicomposting and Why Should You Care?
Vermicomposting is composting with worms. Red wiggler worms break down organic matter. They create worm castings, a powerful fertilizer. Your garden soil gets a nutrient boost. Plants grow stronger and healthier. It reduces food waste too. Landfills get less strain. You save money on fertilizers. Plus, it’s fun and easy. Even beginners can master it.
Worm composting fits any lifestyle. Single person? Small apartment? Big garden? It works. You control the process. No fancy equipment needed. Just some buckets, worms, and scraps. Let’s explore how to set it up.
Benefits of Vermicompost DIY in Your Garden
Vermicomposting offers many perks. Here are the top reasons to try it:
- Improves Soil Quality: Worm castings enrich soil with nutrients. Plants thrive in it.
- Reduces Waste: Kitchen scraps turn into compost. Less trash goes to landfills.
- Saves Money: No need for store-bought fertilizers. Worm castings are free.
- Eco-Friendly: Composting worms help the environment. They reduce carbon footprints.
- Fun and Educational: Kids and adults enjoy it. Learn about nature hands-on.
Ready to create your own worm farm? Let’s dive into the setup process.
Getting Started: Materials for Your Vermicompost DIY
You don’t need much to begin. Gather these simple items:
- 5-Gallon Buckets: Use two or three for stacking. They’re cheap and sturdy.
- Red Wiggler Worms: These composting worms are ideal. Get about 1,000 worms.
- Shredded Newspaper: Acts as bedding. Keep it moist, not soggy.
- Kitchen Scraps: Fruit and vegetable scraps work best. Avoid meat and dairy.
- Drill Bits: For ventilation holes and drainage. A 1/4-inch bit is perfect.
- Screening Material: Prevents worms from escaping. Mesh or fabric works.
- Waterproof Glue: Secures screening material. Ensures a tight seal.
- Piece of Cardboard: Covers the top. Keeps moisture and darkness.
These items are easy to find. Most are already at home. Let’s build your worm composter next.
Step-by-Step Guide to Building a DIY Worm Composter
Follow these steps to create your worm composting bin. It’s simple and quick.
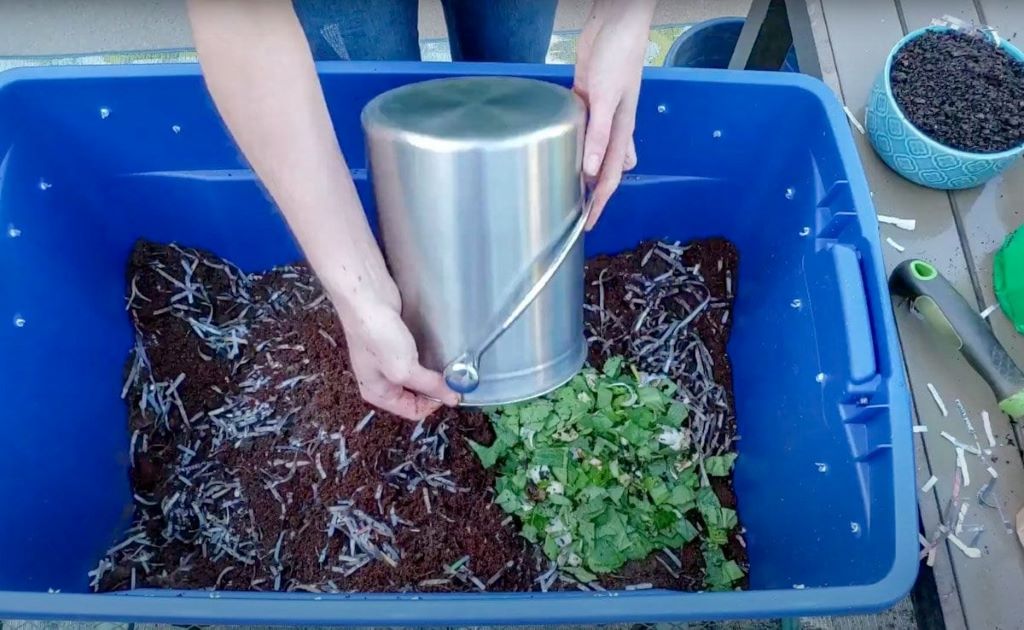
Step 1: Prepare Your Buckets
Grab three 5-gallon buckets. Drill ventilation holes around the top of two buckets. Use a 1/4-inch drill bit. Make small drainage holes in the bottom of one bucket. This is your middle bucket. The third bucket catches excess liquid, called worm juice.
Step 2: Add Screening Material
Cut screening material to fit the drainage holes. Use waterproof glue to secure it. This keeps worms in but lets liquid out. Ensure a tight fit.
Step 3: Create the Bedding
Shred newspaper into strips. Soak it in water until moist. Wring out excess water. Place moist newspaper in the middle bucket. Fill it halfway. Add a handful of soil. This helps worms digest scraps.
Step 4: Add Red Wiggler Worms
Place 1,000 red wiggler worms on the bedding. They’re the best composting worms. Spread them evenly. They’ll start working right away.
Step 5: Add Kitchen Scraps
Chop vegetable and fruit scraps into small pieces. Avoid citrus, onions, and garlic. Add a few handfuls of kitchen scraps. Bury them in the bedding. Don’t overfeed. Start small to avoid fruit flies.
Step 6: Assemble the Worm Composter
Stack the middle bucket on the bottom bucket. Place the bucket with ventilation holes on top. Cover with a piece of cardboard. Keep it dark and moist. Store in a cool, shaded spot.
Step 7: Monitor Moisture Levels
Check the bedding weekly. It should feel like a wrung-out sponge. Too wet? Add dry shredded paper. Too dry? Sprinkle water lightly. Proper moisture level is key.
Your worm farm is ready. Let’s talk about maintaining it.

Maintaining Your Worm Composting Bin
A worm composter needs regular care. Follow these tips to keep it thriving:
- Feed Sparingly: Add food scraps weekly. Two handfuls are enough for a single person.
- Light on Citrus: Citrus can harm worms. Use it sparingly or avoid it.
- Check pH Levels: Worms like neutral pH. Test with a pH strip. Adjust with crushed eggshells if needed.
- Control Fruit Flies: Cover scraps with bedding. Keep a tight lid. Fruit flies hate enclosed spaces.
- Harvest Worm Juice: Collect excess liquid from the bottom bucket. Dilute it for worm tea. Use it as fertilizer.
Regular checks ensure happy worms. Healthy worms produce rich worm castings.
Harvesting Worm Castings and Worm Tea
After 3–6 months, your worm castings are ready. Here’s how to harvest them:
The Dump and Sort Method
Empty the middle bucket onto a tarp. Spread it out. Worms move to the bottom. Scoop castings from the top. Return worms to fresh bedding.
The Migration Method
Stop feeding one side of the bin. Add fresh scraps to the other side. Worms migrate to the food. Collect castings from the empty side.
Collecting Worm Juice
Check the bottom bucket for liquid. Dilute it 10:1 with water. Use it as worm tea. It’s a liquid fertilizer for plants.
Both castings and tea boost your garden. Use them on vegetables, flowers, or herbs.
Common Mistakes to Avoid in Vermicompost DIY
Beginners make mistakes. Here’s how to avoid them:
- Overfeeding: Too many scraps cause odors. Feed small amounts weekly.
- Wrong Bedding: Use shredded newspaper or cardboard. Avoid glossy paper.
- Poor Ventilation: Drill enough holes. Worms need air to thrive.
- Incorrect Moisture: Keep bedding moist, not soggy. Check regularly.
- Wrong Worms: Use red wrigglers. Other worms don’t compost well.
Avoid these pitfalls for a successful worm farm. Your garden will thank you.
Using Worm Castings in Your Garden
Worm castings are versatile. Here are ways to use them:
- Mix into Soil: Add castings to potting soil. Use a 1:4 ratio.
- Top Dressing: Sprinkle castings around plants. Water them in.
- Seed Starting: Mix castings with soil for seedlings. It boosts growth.
- Worm Tea: Spray diluted worm juice on leaves. Plants absorb nutrients fast.
Your plants will grow stronger. You’ll see lush, vibrant gardens.
Indoor Worm Composting: Tips for Small Spaces
No garden? No problem. Indoor worm composting works great. Use a smaller bin. Keep it in a closet or under the sink. Ensure good ventilation. Cover scraps to avoid fruit flies. Check moisture levels often. Indoor bins produce castings too. They’re perfect for houseplants.
Joining a Garden Club for Support
Want to learn more? Join a garden club. Members share vermicomposting tips. They offer advice on worm bins and castings. You’ll find local clubs online. Connect with fellow gardeners. It’s a fun way to grow your skills.
FAQs
What Are the Best Worms for Composting?
Red wiggler worms are ideal. They eat fast and produce rich castings.
How Do I Prevent Fruit Flies in My Worm Bin?
Bury scraps under bedding. Keep the lid tight. Avoid overfeeding.
Can I Use Any Bucket for Vermicomposting?
Use food-grade 5-gallon buckets. Ensure they’re clean and have drainage holes.
How Often Should I Feed My Worm Composter?
Feed weekly. Add a few handfuls of scraps. Don’t overdo it.
What Should I Avoid Feeding My Worms?
Skip meat, dairy, citrus, and oily foods. Stick to vegetable and fruit scraps.
Start Your Vermicompost DIY Today
Vermicomposting is simple and rewarding. You turn kitchen scraps into garden gold. Red wiggler worms do the hard work. Your plants get a nutrient boost. Your wallet stays happy. Plus, you help the planet. Ready to start your vermicompost DIY in your garden? Grab some buckets and worms. Follow this guide. Share your progress with us! Comment below or join a garden club. Let’s grow greener together!
References
- University of Illinois Extension: Composting with Worms
https://extension.illinois.edu/composting/worm-composting - Cornell Waste Management Institute: Vermicomposting Basics
http://compost.css.cornell.edu/worms/basics.html - EPA: Composting at Home
https://www.epa.gov/recycle/composting-home - NC State Extension: Vermicomposting Guide
https://content.ces.ncsu.edu/vermicomposting-a-guide-to-using-worms-to-recycle-organic-waste - Gardening Know How: DIY Worm Bin Instructions
https://www.gardeningknowhow.com/composting/vermicomposting/worm-composting-bins.htm
Read More: