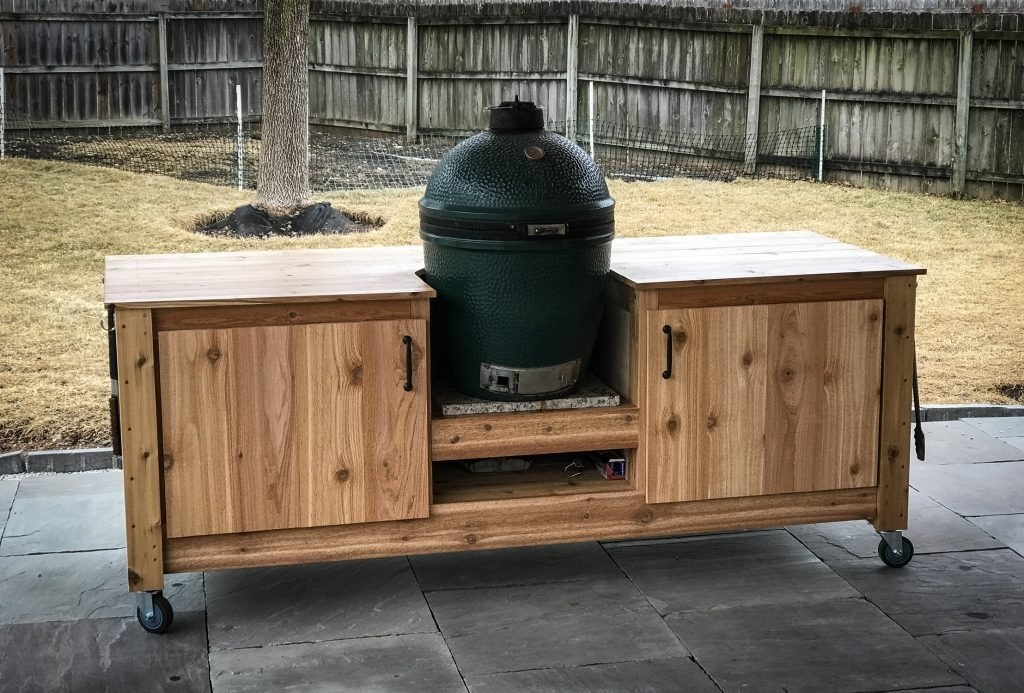
If you’re a Big Green Egg enthusiast, you already know it’s more than just a grill—it’s a backyard cooking experience. But to truly unlock the potential of this ceramic marvel, you need the right setup. Enter the DIY Green Egg Table—a custom-built station designed to enhance your grilling efficiency, keep your tools organized, and add rustic charm to your outdoor space.
Instead of shelling out hundreds of dollars for a pre-built table, why not craft your own? This guide provides you with everything you need to know: from choosing the right materials and tools to building a durable, heat-resistant, and stylish table that perfectly fits your Big Green Egg.
Why Build a DIY Green Egg Table?
Whether you’re a weekend pitmaster or a full-time grill geek, a dedicated table offers multiple advantages:
- Increased workspace: Chop, season, and prep without running back to the kitchen.
- Enhanced safety: A sturdy base with proper ventilation reduces the risk of heat damage.
- Custom design: Tailor your table to your outdoor décor and personal needs.
- Cost-effective: Building your own table can save you $200–$600 or more compared to buying one.
What You’ll Need: Materials and Tools
Before diving into construction, make sure you have the right materials and tools. This ensures a smooth build process and a professional-quality finish.
🛠 Materials
- Pressure-treated lumber or cedar/redwood for durability (2x4s and 2x6s)
- Exterior-grade plywood or solid hardwood slab for the tabletop
- Galvanized screws and bolts
- Pocket hole screws
- Heat shield or paver stone for under the egg
- Casters or heavy-duty legs (optional for mobility)
- Silicone caulk or weatherproof sealant
- Outdoor wood stain or paint
🧰 Tools
- Circular saw or table saw
- Drill and bits
- Pocket hole jig (Kreg jig)
- Measuring tape
- Level
- Orbital sander
- Clamps
Step-by-Step Instructions to Build a Green Egg Table
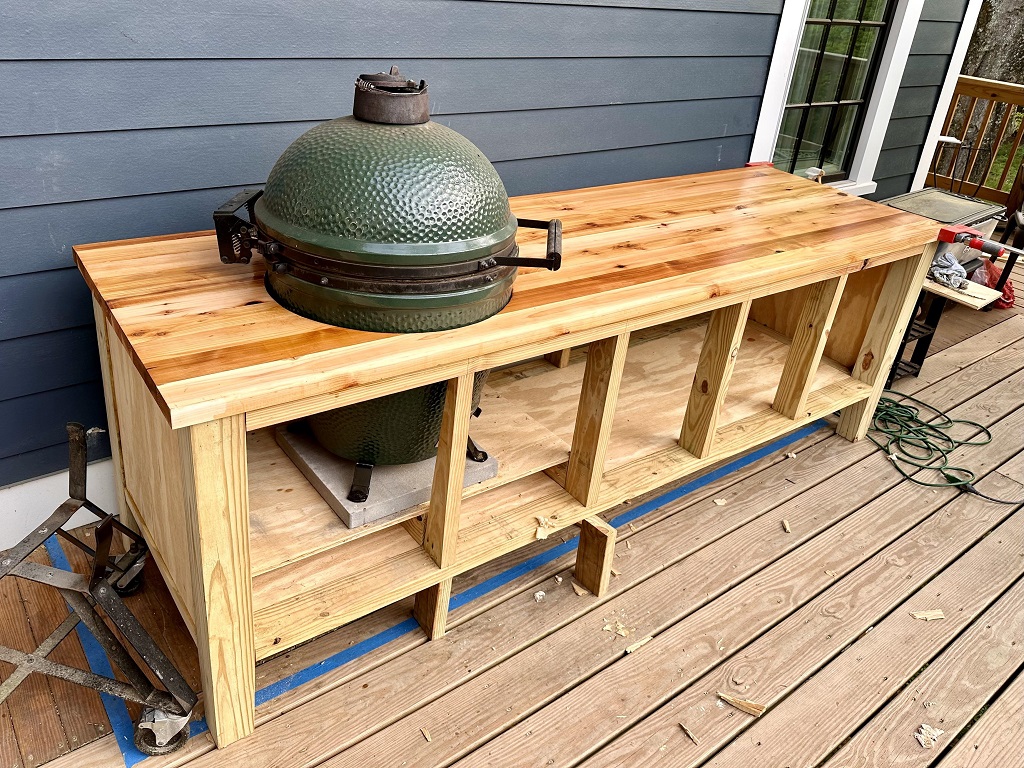
Let’s break the project into manageable steps for ease and clarity.
Step 1: Plan and Measure
Start by measuring your Big Green Egg. The most common sizes include the Large, XL, and 2XL, and each has different clearance requirements. Plan for:
- A 1–2 inch gap around the egg for ventilation
- Sturdy corner supports to hold weight (some eggs weigh over 150 lbs)
- Adequate counter space on both sides for prep work
Pro Tip: Use design plans or DIY woodworking software to visualize your project.
Step 2: Build the Frame
Use 2×4 or 2×6 boards to construct the outer frame. This includes the top surface frame and bottom shelf supports.
- Assemble two rectangles—one for the table top and one for the lower shelf
- Use pocket hole screws to attach cross supports
- Ensure everything is square and level
Step 3: Cut the Egg Hole
Use a jigsaw or router to cut a circular opening in the top panel for your Green Egg to sit in.
- Make sure the egg’s base sits above the shelf line for proper air circulation
- Leave space for expansion due to heat
Safety Note: Never let the egg touch wood directly—use a heat barrier like a paver, firebrick, or a special metal egg ring.
Step 4: Assemble the Legs and Shelves
Attach legs to the table using carriage bolts for extra strength. Add the lower shelf, which will hold charcoal, tools, or even act as a footrest.
- Use cleats or pocket holes for additional support
- Include diagonal braces if needed for extra stability
Step 5: Add Finishings
Now that the structure is complete, it’s time to sand, stain, and seal.
- Use exterior-grade wood stain or UV-protective paint
- Seal all edges with caulk or weatherproof sealer
- Allow proper drying time before placing the egg
Optional Add-ons:
- Fold-out side shelves
- Built-in utensil hooks
- Locking casters for mobility
- Weatherproof cover for protection
Safety Tips for Your Green Egg Table
- Ventilation is Key: Never fully enclose your egg. Proper airflow is crucial for temperature control and fire prevention.
- Fire Safety Barrier: Always use a non-combustible material under the egg to avoid wood scorching.
- Avoid Flammable Coatings Near Egg Base: Keep sealants or stains away from the area under the egg unless they are high-heat safe.
Maintenance Tips for Long-Term Use
- Re-seal annually to prevent water damage and cracking.
- Check bolts and screws every few months.
- Clean off grease or ash buildup from shelves and base.
- Cover your table when not in use to protect it from the elements.
Green Egg Table Design Ideas to Inspire You
Need design inspiration? Here are a few ideas:
🔹 Rustic Farmhouse Style
Use reclaimed wood and dark walnut stain. Add black iron hardware for a rugged look.
🔹 Modern Minimalist
Clean lines, painted finishes, and stainless steel accents make a sleek table design.
🔹 Portable Grill Cart
Use locking casters and a collapsible prep area to create a mobile outdoor cooking station.
🔹 Two-Egg Setup
If you’re a serious griller, create space for two Green Eggs—one for smoking, one for grilling.
Frequently Asked Questions (FAQs)
✅ How much does it cost to build a DIY Green Egg table?
Expect to spend $100–$300 depending on materials. Cedar or redwood will cost more than pressure-treated pine.
✅ Can I use regular wood?
Yes, but pressure-treated or rot-resistant woods like cedar or redwood are recommended for outdoor use.
✅ What size should the hole for the Green Egg be?
It depends on your egg model. A Large Green Egg typically requires a 16–17 inch hole. Always measure your specific unit.
✅ Do I need a heat shield?
Absolutely. A paver stone, metal plate, or fire brick should be placed between the egg and wooden surface to prevent heat damage.
✅ Can I add storage?
Yes! Drawers, cabinets, and tool hooks can be built into the design. Make sure they’re weather-resistant and easy to clean.
Read More Also: How to build an off-grid home legally
Final Thoughts: Build Your Perfect Outdoor Grilling Station
A DIY Green Egg table isn’t just a weekend project—it’s a backyard upgrade that transforms your cooking experience. You’ll have a functional, stylish, and sturdy setup that complements your grilling skills while impressing your guests.
Whether you’re building it as a first-time DIYer or a seasoned woodworker, this guide gives you everything you need to create a high-quality grill station that lasts for years.
Read More Also: Eco-Friendly Energy Options for Small and Medium Businesses: A Complete Guide to Sustainable Power Solutions
✅ Ready to Build Your DIY Green Egg Table?
Download our free printable plans, browse more kamado grill table designs, and join our grilling enthusiast newsletter for monthly inspiration, tips, and tool recommendations!